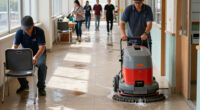
Use this guide to clean a compatible hard floor with an automatic floor scrubber and leave the machine ready for its next use. It is written for beginners who can follow equipment labels and basic workplace safety instructions. Plan for 30-60 minutes, depending on floor size, soil level, and machine type.

Get cleaning gear delivered free with Prime
- Fast, free delivery on millions of items
- Prime Video, Amazon Music and more included
- Member-only deals all year

KARHDIR RO850 Walk-Behind Floor Scrubber, 22-Inch Cleaning Width
- ✔ Cleaning width: 22 inches
- ✔ Squeegee suction width: 31.5 inches
- ✔ Stated coverage: Up to 32,000 square feet per hour

Dapper Supply Mini Automatic Floor Scrubber, 15-Inch Cleaning Width
- ✔ Cleaning width: 15 inches
- ✔ Brush speed: 170 RPM
- ✔ Stated runtime: Up to 90 minutes
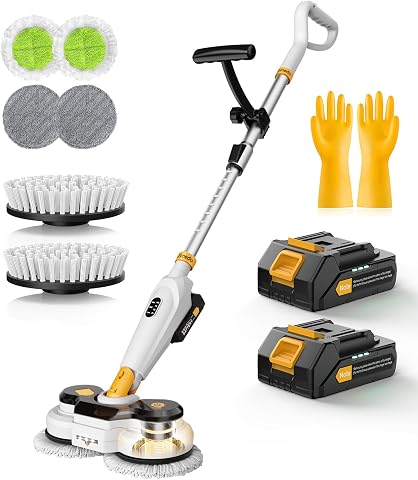
Cordless Electric Mop M3, 6000mAh, 2-in-1 Floor Scrubber & Spin Mop
- ✔ Battery capacity: 6,000 mAh
- ✔ Speed settings: 400 / 600 / 800 RPM
- ✔ Low-speed runtime: Up to 420 minutes
Difficulty: Beginner | Time: 30-60 minutes
What You’ll Need
Tools & Materials:
- Automatic floor scrubber with working brushes or pads and squeegee
- Floor cleaning solution approved for the machine and floor
- Clean water
- Wet-floor signs or barriers
- Personal protective equipment required by the product label or workplace rules
- Broom or dust mop
Knowledge:
- Ability to identify the floor type and follow the scrubber’s operating manual
- Basic awareness of electrical, chemical, and slip hazards
Check the machine manual and cleaner label before use. Confirm that the solution suits both the scrubber and floor; some machines require low-foam detergent, and some floors can be damaged by unsuitable chemicals. Do not mix cleaning products. Charge the battery or check the power supply before starting.
KARHDIR RO850 Walk-Behind Floor Scrubber, 22-Inch Cleaning Width
When a facility has wide stretches of hard flooring, the KARHDIR RO850 has the most substantial scrub-and-recover setup in this group. Its 22-inch brush is wider than the Dapper Mini’s 15-inch path, while the 31.5-inch squeegee and large tanks are designed to reduce repeated passes and water-handling stops. The listed coverage reaches up to 32,000 square feet per hour, but actual productivity will depend on layout, obstacles, and operating conditions.That scale comes with a clear cost in handling: at 300 pounds and roughly 50 × 31 × 42 inches, the RO850 needs storage space and a suitable way to move it. The Dapper is a more sensible fit for narrow aisles and smaller rooms; the Qimedo is much easier to store but is not a direct replacement for a walk-behind machine. We would shortlist the KARHDIR for hard-floor facilities that can accommodate its size and benefit from its large capacity. Its stated floor compatibility is broad, but it remains limited to hard floors.
Pros:
- 22-inch brush and 31.5-inch squeegee support broad cleaning passes.
- 15.9-gallon solution and 18.5-gallon recovery tanks reduce frequent water handling.
- Polyethylene housing is described as corrosion- and impact-resistant.
- Includes a scrub brush, rubber strip, and additional consumable parts.
Cons:
- At 300 pounds, it is difficult to move and requires substantial storage space.
- Designed for hard floors, so it cannot serve as a carpet cleaner.
Best for: Facilities cleaning large areas of compatible hard flooring that can store and handle a 300-pound walk-behind machine.
Not ideal for: Small rooms, tight layouts, carpeted spaces, or buyers who need a light, easily carried cleaner.
Bottom line: Choose the RO850 when broad hard-floor coverage and large tanks matter more than compact storage or easy handling.
“Choose the RO850 when broad hard-floor coverage and large tanks matter more than compact storage or easy handling.”
Dapper Supply Mini Automatic Floor Scrubber, 15-Inch Cleaning Width
The Dapper Supply Mini makes the most sense when a full-size walk-behind scrubber would be cumbersome. Its 15-inch cleaning width and 22-pound listed weight make it a much smaller proposition than the 300-pound KARHDIR, while its squeegee and suction motor are designed to pick up dirty water after scrubbing. That recovery setup is a practical advantage over the Qimedo M3, whose description gives a spray tank but does not specify suction or water recovery.Its compact form does mean smaller capacity: the solution tank holds 1.2 gallons and the recovery tank 1.5 gallons, far below the KARHDIR’s tanks. The stated runtime is up to 90 minutes, with a 100-minute charge time, so planning around charging may matter for back-to-back cleaning sessions. It is intended for sealed hard floors and should be skipped for carpets or rugs. For smaller commercial spaces where maneuverability and water pickup matter, it offers a more appropriate balance than a large machine; for extensive floor runs, the KARHDIR’s wider path and larger tanks are better suited.
Pros:
- Compact, 22-pound design is easier to maneuver than the KARHDIR walk-behind machine.
- Squeegee and 70 W suction motor recover water from cleaned floors.
- Up to 90 minutes of stated battery runtime.
- Suitable for several types of sealed hard flooring.
Cons:
- The 1.2-gallon solution and 1.5-gallon recovery tanks are small beside the KARHDIR’s capacities.
- The stated 100-minute charge time can interrupt frequent or continuous use.
- Not intended for carpets or rugs.
Best for: Small commercial spaces with sealed hard floors, tight maneuvering needs, and a preference for active water recovery.
Not ideal for: Carpeted areas, large facilities needing fewer refills, or operations that cannot accommodate its charging interval.
Bottom line: Pick the Dapper Mini for smaller sealed-floor jobs where compact handling and water recovery outweigh tank capacity.
“Pick the Dapper Mini for smaller sealed-floor jobs where compact handling and water recovery outweigh tank capacity.”
Cordless Electric Mop M3, 6000mAh, 2-in-1 Floor Scrubber & Spin Mop
The Qimedo M3 is the most approachable option for smaller, lighter-duty cleaning, with a telescopic handle, spray function, and brush speeds of 400, 600, or 800 RPM. Its 50-inch extended handle and LED at the brush head help reach low-light corners without the same bending involved in hand mopping. Unlike the Dapper and KARHDIR, however, it is a spin mop rather than a walk-behind scrubber with a stated recovery squeegee, so buyers should not expect the same floor-drying workflow.The 6,000 mAh battery is listed for up to 420 minutes at low speed, but that runtime figure should be read in context: operating mode affects how long it lasts, and the listing gives a 2.5-hour charge time. Its removable 450 ml water tank is convenient for spot cleaning but small beside either machine’s gallon-capacity tanks. The M3 also should not be used in tubs or submerged. We would choose it for routine home or small-area cleaning where easy handling and adjustable spin speed take priority; commercial buyers needing sustained scrubbing and water pickup should move up to the Dapper or KARHDIR.
Pros:
- Three speed settings, up to 800 RPM, allow adjustment for different cleaning tasks.
- Removable spray tank makes it easy to add water for wet cleaning.
- Telescopic handle extends to 50 inches, and the brush head has an LED light.
- Display shows battery percentage and selected mode.
Cons:
- The 450 ml tank is far smaller than the Dapper and KARHDIR tanks.
- No suction-based water recovery is specified, unlike both walk-behind scrubbers.
- Not suitable for use in tubs or for submersion.
Best for: Home users or small-space cleaners who want a cordless spin mop with adjustable speed and a spray feature.
Not ideal for: Large commercial floors, buyers who need a walk-behind scrubber, or anyone requiring a specified water-recovery system.
Bottom line: The M3 suits smaller cleaning jobs where a light spin mop is more useful than commercial-scale capacity or water recovery.
“The M3 suits smaller cleaning jobs where a light spin mop is more useful than commercial-scale capacity or water recovery.”
As an Amazon Associate we earn from qualifying purchases.
Before You Start
Keep people out of the work area while the floor is wet. Put out wet-floor signs at entrances and block access where needed. Inspect the floor for loose items, cords, standing liquid, and debris that could clog the machine or create a hazard. Do not use the scrubber on carpet, untreated wood, or any surface the machine or cleaner label excludes. If the floor has a spill involving an unknown or hazardous substance, follow site procedures instead of scrubbing it.
Step-by-Step Instructions
Step 1: Clear and sweep the floor
Move obstacles that can be safely moved, then sweep or dust-mop the area. Pick up large debris by hand with suitable protection. Pay attention to corners and edges where grit can collect; debris under a brush can scratch the floor or block the vacuum pickup.
Tip:Plan a route that starts at the farthest point and finishes near the exit. Leave a clear path so you do not have to cross a freshly scrubbed section.
Check: The route is clear, loose dirt has been removed, and signs or barriers are visible at access points.
Step 2: Inspect the scrubber
Turn the machine off before inspecting it. Check the brushes or pads for wear and secure attachment, the squeegee blades for tears or embedded debris, and the tanks, hoses, and cables for damage or leaks. Confirm that the recovery tank is empty and the solution tank is clean. Replace worn parts or report damage before operating.
Tip:Follow the manual’s inspection procedure for your model. Do not reach under a brush or squeegee while the machine is powered.
Check: The machine has no visible damage or leaks, the pickup blades are clean, and the brush or pad is firmly fitted.
Step 3: Prepare the cleaning solution
Fill the solution tank with water at the temperature allowed by the manual. Measure and add the approved detergent at the label’s dilution rate, or use the machine’s dosing system as directed. Keep solution away from your skin and eyes, and close the container after measuring. Do not add extra detergent to compensate for a dirty floor.
Tip:Too much detergent can leave residue, create excess foam, or interfere with recovery. Use only the amount specified by the product label.
Check: The tank contains the specified amount of correctly diluted solution, with no unapproved products mixed in.
Step 4: Set the machine controls
Mount the brush or pad specified for the floor and cleaning task. Set the solution flow, brush pressure, and vacuum controls according to the manual and the floor’s condition. If this is your first time using the model, read the control labels and practice the start and stop controls in a clear area before approaching the cleaning route.
Tip:Use the lowest effective brush pressure and solution flow. High settings can damage sensitive floors, drain the tank quickly, or leave excess water.
Check: The brush or pad is suitable for the floor, and you can locate the drive, brush, solution, and vacuum controls.
Step 5: Scrub a small test area
Start the scrubber and clean a small, inconspicuous patch using the planned settings. Keep a steady, controlled pace and overlap the next pass slightly so narrow strips are not missed. Stop and inspect the surface after the pass, including the amount of water recovered and the floor’s appearance.
Tip:If the machine leaves a film, excessive water, or visible marks, stop and check the detergent dilution, squeegee condition, and settings before cleaning the full area.
Check: The test patch looks clean without damage or detergent residue, and the squeegee leaves it nearly dry.
Step 6: Clean the full area
Follow the planned route in straight, overlapping passes. Keep the squeegee in contact with the floor and move at a pace that allows the machine to recover the solution. Watch for people, doorways, obstacles, and changes in floor level. Pause if the solution or recovery tank needs attention, and turn the machine off before opening or servicing it.
Tip:Do not make tight turns at speed. Slow down around corners and use controlled reverse movement only if the model allows it.
Check: The passes cover the intended floor without untreated lanes, and the machine is collecting the dirty solution rather than spreading it.
Step 7: Check the floor and repeat where needed
Inspect the cleaned surface from several angles under the available lighting. Look for missed strips, sticky patches, foam, and standing water. Re-scrub only the affected sections after checking the solution mix and machine condition. Keep signs or barriers in place until the floor is dry.
Tip:Allow extra drying time in poorly ventilated areas or where the floor has grooves. Do not invite foot traffic onto a damp surface.
Check: The floor is visibly clean, has no pooled solution, and dries without a slippery film.
Step 8: Empty and rinse the machine
Park the scrubber on a suitable drain or service area, turn it off, and follow the manual’s shutdown steps. Empty the recovery tank according to site rules, then rinse it with clean water. Drain any remaining solution from the solution tank if the manual calls for it. Rinse the squeegee, pickup channel, and brushes or pads, removing trapped hair and debris.
Tip:Wear the protection required for contact with recovered dirty water and cleaning chemicals. Avoid splashing and do not discharge waste where local or site rules prohibit it.
Check: The tanks and pickup parts are free of visible soil and residue, and waste has been disposed of in the approved place.
Step 9: Store the scrubber safely
Wipe the machine dry where needed, leave tanks open or lids ajar if the manual recommends it, and store it in the designated area. Charge the battery or connect power only as directed by the manufacturer. Coil cables safely, remove disposable pads if required, and report any fault noticed during cleaning.
Tip:Do not store the machine where it can freeze if water remains in its system.
Check: The scrubber is switched off, clean, stored securely, and charging or disconnected as its manual specifies.
Common Mistakes to Avoid
- Using the wrong detergent or too much of it, which can create foam or a slippery residue. — Check compatibility and dilution on both the machine and product labels; measure the dose instead of estimating.
- Skipping sweeping, allowing grit to scratch the floor or clog the pickup system. — Sweep the full route first and remove larger debris before operating the scrubber.
- Moving too quickly or failing to overlap passes, leaving wet streaks or missed lanes. — Use a steady pace, overlap each pass slightly, and confirm the squeegee leaves the floor nearly dry.
- Leaving dirty water in the recovery tank after use, allowing odors and residue to build up. — Empty and rinse the recovery tank after each cleaning session, then clean the pickup parts.
Troubleshooting
Problem: The scrubber leaves water streaks or puddles.
Solution: Stop the machine and inspect the squeegee blades for dirt, wear, or poor contact. Clean or replace them as directed, check that the vacuum is operating, and slow down if needed.
Problem: The machine produces excessive foam or leaves a sticky film.
Solution: Check that the detergent is approved and correctly diluted. Empty and rinse the tanks if the solution is wrong, then refill with the specified mix. Do not add defoamer unless the machine manual permits it.
Problem: The brush or pad does not rotate or the machine stops moving.
Solution: Switch off the machine and check the manual for battery, drive, brush, and overload indicators. Clear wrapped debris only after shutdown, and do not restart if there is a burning smell, damaged cable, or repeated fault.
Problem: The floor remains dirty after a pass.
Solution: Check for a clogged brush, worn pad, incorrect solution flow, or unsuitable detergent. Confirm the surface is compatible, correct the cause, and make another controlled pass over the affected area.
What Success Looks Like
The completed floor looks evenly clean, with no missed strips, pooled water, sticky residue, or visible detergent film. The surface dries safely before barriers are removed. The scrubber is switched off, its tanks and pickup parts are rinsed, and it is stored or charged according to the manual.
Next Steps
Record any machine fault or unusual floor damage and notify the responsible person before the next shift. Replace worn pads or squeegee blades as the manual directs, and return chemicals to labeled storage. Repeat the inspection and rinse routine after each use.
Frequently Asked Questions
Can I use any floor cleaner in an automatic scrubber?
No. Use a product approved for the scrubber and the floor. Many machines need low-foam detergent, and incompatible chemicals can damage surfaces or create foam that disrupts recovery.
How much detergent should I add?
Use the product label’s dilution rate or the scrubber’s dosing instructions. Measure the amount; extra detergent can leave residue and make the floor slippery.
Should I sweep before using the scrubber?
Yes. Sweep or dust-mop first to remove grit and larger debris that can scratch the floor, clog the machine, or reduce pickup.
How dry should the floor be after scrubbing?
The squeegee should recover most of the solution, leaving the surface nearly dry rather than puddled. Keep signs in place until the floor has dried fully.
Do I need to clean the machine after every use?
Yes. Empty and rinse the recovery tank and clean the squeegee, pickup channel, and brushes or pads after each session. This helps prevent residue, odors, and poor pickup on the next use.
Veterans Day Picks

Shark Matrix Plus 2-in-1 Robot Vacuum and Mop with 60-Day Self-Emptying Base
As an affiliate, we earn on qualifying purchases.